cPanel Setup Basics
How to setup cPanel – A Basic Tutorial
![]() If you followed the advice given when selecting a Web Hosting Provider you would have signed up or will sign up for a Web Hosting Account that includes cPanel. cPanel is a Web-Based Control Panel Tool, which is accessible via your Web Browser. cPanel gives you access to a host of controls which allows you to manage almost every aspect of your website and/or your hosting account.
If you followed the advice given when selecting a Web Hosting Provider you would have signed up or will sign up for a Web Hosting Account that includes cPanel. cPanel is a Web-Based Control Panel Tool, which is accessible via your Web Browser. cPanel gives you access to a host of controls which allows you to manage almost every aspect of your website and/or your hosting account.
cPanel is relatively simple to understand and there are hundreds of websites offering detailed tutorials on how to accomplish every task within cPanel. The best place to get detailed instructions or tutorials from, is your Web Hosting Company and/or those found on the cPanel Website: cPanel Video Tutorials.
To use cPanel you will need the cPanel URL, UserName & Password…
All of which should be supplied by your Web Hosting Provider.
 cPanel Setup – Getting Started
As mentioned cPanel is pretty simple to use, however, it can be a little intimidating when you first logon as it contains so many options. The image to the left of this text shows what the cPanel Tool looks like, once logged in (this a branded version belonging to my Hosting Company (Futurity Web).
Click Here or on the image to enlarge
(opens in a new Window)
To get you on your way I am only going to introduce the sections required to get your website up & running. This is a very basic cPanel Tutorial showing you Step-by-Step how to accomplish 4x basic cPanel tasks necessary to get your website setup and ready for content.
cPanel Setup Wizard
In most circumstances, when you login to cPanel for the 1st Time, you will be confronted with a Pop-Up Message asking you if you need help getting started. Although the cPanel Setup Wizard is a great tool, some of the detail it goes into is a little overwhelming for beginners. Close the Pop-up or press the: "No Thanks I’m Fine" Button.
 If you want to go through the cPanel Setup Wizard at a later stage you can access it using the Getting Started Wizzard Icon, located in the Preferences Section. The Wizard is a relatively simple step-by-step process which guides you through setting up all the basic requirements of your website. This Wizard is also a detailed Help File which educates you on additional basic features and how to configure them. As mentioned it can be a little overwhelming, but it is worth going through (Just skip any steps you feel uncomfortable with).
[Note] You don’t need to use the Wizard as the steps below will tell you exactly which sections you will be using to get your website started. [/Note]
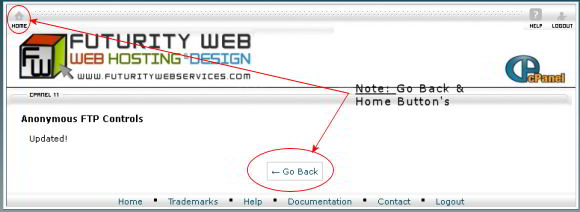
NOTE: Please view the above image – Notice the Home & Go Back Buttons!
Use the home button to get back to the main cPanel Window after changing a setting…
How to setup cPanel – 4x Basic Tasks
There are only 4x Areas within the cPanel Tool that I am going to touch on now. These are the primary ones needed to setup your Website. The last of the 4 items is the Installation of WordPress which is covered in more detail later. For cPanel it doesn’t really matter what sequence you do these next few steps in, but I suggest you follow the order as indicated below, for no other reason, other than you will need you e-mail address for some of the other steps, hence my recommending you do this first.
1. Setting Up a Primary Mailbox:

All you need to do here, is click on the Email Accounts Icon… and on the next screen:
– fill in your chosen e-mail address (the part before the domain name)
– Insert a Password or use the Password Generator (The stonger the password the better)
– Click the Create Account Button
That’s It, You’re Done – Your maibox has been created!
– Click Home Button (top left corner)
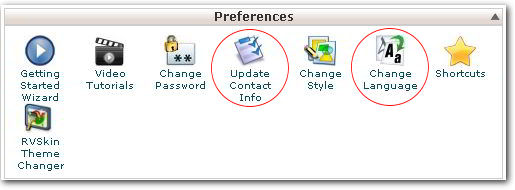
Under Preferences we are only going to look at two options:
– Change Language: This is probably unnecessary, but I feel it is best to check.
– Click on the Change Lannguage Icon – On the next Page Check that the Language is set to the correct language. If not change it!
– Click Home Button to get back to the Main cPanel Screen.
Next
– Click Update Contact Info
– Insert your prefered Contact e-Mail Address & a Secondary address if required.
– Select or De-Select Contact Preferences as per your requirements (Check or Un-Check the 3x Boxes)
– Click save
That’s your Preferences Done – Congratulations!
– Click Home Button (top left corner)
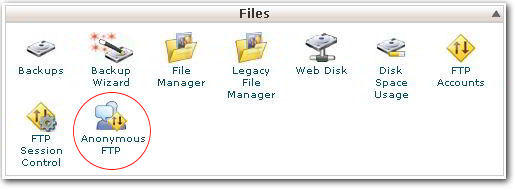
There is only one thing do here and that is to prevent Anonymous users from connecting to your website and thus preventing them from uploading files to your Hosting Account/Website.
Disable Anonymouse FTP:
– Click on Anonymous FTP Icon
– Disable or remove the ticks from the checkboxes
- Allow anonymous access to ftp://ftp.yourdomain.co.za
- Allow anonymous uploads to ftp://ftp.yourdomain.co.za/incoming
– Click Save Settings Button
Presto – Another Task Done!
– Click Home Button (top left corner)
Note: The primary FTP Address needed for you to access the website to manually upload/download files should have been setup by your Web Hosting Provider. The UserName & Password for this is, in all likelyhood, the same as that used to access cPanel. I will add a link to this section once my Article on using FTP has been added to the website.
4. Software/Services: Installing WordPress
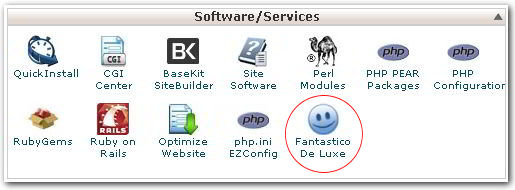
To install WordPress and/or other similar type programmes or scripts, we make use of an Application called Fantastico. This tool is an add-on to cPanel that comes standard with all the Web Hosting Plans mentioned when I discussed finding a suitable WordPress Web Hosting Provider. If you do NOT have Fantastico, then I recommend you contact your Hosting Provider for assistance.
– Click on Fantastico Icon
– In the left-hand column, click on WordPress (under Blogs Heading)
– In New Main Window with Heading WordPress, Click on New Installations Link (Check Disk Space is Sufficient)
On the WordPress Installation Screen,…
– Leave the Installation Location Settings as the default domain and
– The install in Directory as Blank *
* More advanced users may want to install WordPress into a seperate directory
Under Heading: Admin access data,…
– Add an Administrator UserName & Password
– This can be anything you desire, but I generally make mine the same as my cPanel UserName & Password
Under Heading: For Base configuration,…
– Insert an Admin Nickname (or the actual Admin Name)
– Add the Admin e-Mail Address (preferable to use the one @yourdomain.co.za)
– Insert Your Website Name (eg. Italian Food Recipes) i.e. Insert the Name, not the URL
– Insert your Website Description (eg. A collection of great Italian Meals)
– Click the Install WordPress Button
The next screen asks if you want to send a confirmation e-mail and asks for the e-mail address to which to send it, but basically that’s it.
WhooHa -You have now installed WordPress!
Now that you know ‘How to setup cPanel & WordPress…
it’s time to login to your WordPress Dashboard. To login to WordPress you need the Admin Console’s URL and the UserName & Password used during the installation of WordPress. If you followed the cPanel Setup Instructions above, the Login URL will be your domain name followed by: /wp-admin
eg. www.yourdomain.co.za/wp-admin
Footnote: How to use WordPress is not covered in this article!
[Note] Note: This is a very brief introductory lesson on using cPanel and installing or setting up the basics required to get your website off the ground. I never intended writing this article when I started this website but I thought it may help those of you anxious to get started, since it is taking longer than expected to add the other pages.[/Note]
